<?php
ini_set('display_errors', 1);
ini_set('error_reporting', 'E_ALL^E_NOTICE');
ini_set('date.timezone', 'Asia/Seoul');
require_once('TwitterAPIExchange.php');
if(!$q) $q = urlencode("그누보드");
if($_GET['stx']) $q = urlencode($_GET['stx']);
if($_GET['q']) $q = urlencode($_GET['q']);
//-- https://github.com/J7mbo/twitter-api-php/wiki/Twitter-API-PHP-Wiki 소스 샘플 --//
/** Set access tokens here - see: https://dev.twitter.com/apps/ **/
$settings = array(
'oauth_access_token' => "**************-5MOvYm2JOrQeLZdhVA4tuXD0qAlm5HHrXqRfmNB",
'oauth_access_token_secret' => "Gsty8aG4Iwnh************jOjmQakwPjKZngi6bXT7Jrk",
'consumer_key' => "bJcUKFFltGuW6*******oTsYq",
'consumer_secret' => "37Wxu6mJO4ppEY24************kXZWXrpnMkgrZLszwc9aOyM5"
);
$url = 'https://api.twitter.com/1.1/search/tweets.json';
$requestMethod = 'GET';
$getfield = '?q='.$q.'&count=15";';
$twitter = new TwitterAPIExchange($settings);
$response = $twitter->setGetfield($getfield)
->buildOauth($url, $requestMethod)
->performRequest();
$data2 = json_decode($response, true);
/*
function print_r2($var)
{
ob_start();
print_r($var);
$str = ob_get_contents();
ob_end_clean();
$str = preg_replace("/ /", " ", $str);
echo nl2br("<span style='font-family:Tahoma, 굴림; font-size:9pt;'>$str</span>");
}
*/
function autolink($text){
return preg_replace('@(https?://([-\w\.]+)+(:\d+)?(/([\w/_\.-]*(\?\S+)?)?)?)@', '<a href="$1" target="_blank">$1</a>', $text);
}
function chgdate($d){
$y = array("01"=>"January", "02"=>"February", "03"=>"March", "04"=>"April", "05"=>"May", "06"=>"June", "07"=>"July", "08"=>"August", "09"=>"September", "10"=>"October", "11"=>"November", "12"=>"December");
$tmp = explode(" ", $d);
foreach($y as $k=>$v) if(strtolower($v) == strtolower($tmp[1])) $tmp[1] = "$k";
$tmp_date = $tmp[5] . "-" .$tmp[1] . "-" . $tmp[2] . " " . $tmp[3];
$d = date("Y.m.d H:i:s", strtotime($tmp_date)+(60*60*9));
return $d;
}
//-- 목록 시작
?>
<!DOCTYPE html>
<html>
<head>
<meta http-equiv="X-UA-Compatible" content="IE=Edge,chrome=1">
<style>
body { font-size:12px; margin:0; padding:0; font-family:Arial; }
a { text-decoration:none; }
img { border:0; }
</style>
</head>
<body>
<style>
#twitter_box { height:300px; width:100%; overflow-y:scroll; }
#twitter_box .twt_list_box { clear:both; }
#twitter_box .twt_list_box .profile_pic { float:left; width:10%; }
#twitter_box .twt_list_box .profile_pic span { display:inline-block; margin:5px; }
#twitter_box .twt_list_box .text_box { float:left; width:90%; }
#twitter_box .twt_list_box .text_box .user .name { display:inline-block; padding:5px 10px 4px 0; } /* 이름 */
#twitter_box .twt_list_box .text_box .user .name a { color:#3C3C3C; font-weight:bold; font-size:15px; } /* 이름 */
#twitter_box .twt_list_box .text_box .text { margin-bottom:20px; }
#twitter_box .twt_list_box .text_box .text .content { font-size:14px; color:#444444; line-height:130%; }
#twitter_box .twt_list_box .text_box .text .info { display:inline-block; margin: 5px 5px 0 0; }
#twitter_box .twt_list_box .text_box .text .info .src { color:#B3B3B3; font-size:11px; font-family:Arial; } /* 작성 환경 */
#twitter_box .twt_list_box .text_box .text .info .src a { color:#B3B3B3; font-size:11px; font-family:Arial; } /* 작성 환경 */
#twitter_box .twt_list_box .text_box .text .info .date { margin-left:20px; font-family:Arial; color:#868686; }
#twitter_box .twt_list_box .text_box .text .info .retweet { margin-left:20px; font-size:12px; font-family:Dotum; color:#929292; }
#twitter_box .twt_list_box .text_box a { color:#369ED9; font-family:Dotum; }
#twitter_box .twt_list_box .text_box a:hover { text-decoration:underline; }
#twitter_box .redo { text-align:right; }
#twitter_box .redo span { display:inline-block; padding:3px 10px 3px 10px; margin:3px; }
#twitter_box .redo span a { color:#464646; }
#twitter_box .redo span.sword { color:#989898; }
.line { clear:both; border-top:1px solid #EFEFEF; }
</style>
<div id="twitter_box">
<div class="redo"><span class="sword">검색어 : <?=urldecode($q)?></span><span><a href='?q=<?=$q?>'>새로고침 </a><img src="img/icon_redo.gif" valign="middle"></span></div>
<div class="line"></div>
<? for($i = 0; $i < count($data2['statuses']); $i++) :?>
<div class="twt_list_box">
<div class="profile_pic"><span><img src="<?=$data2['statuses'][$i]['user']['profile_image_url']?>"></span></div>
<div class="text_box">
<div class="user"><span class="name"><a href="https://twitter.com/]?>" target="_blank"><?=$data2['statuses'][$i]['user']['name']?></a></span></div>
<div class="text">
<div class="content"><?=autolink($data2['statuses'][$i]['text'])?></div>
<div class="info"><span class="src"><?=$data2['statuses'][$i]['source']?></span><span class="date"><?=chgdate($data2['statuses'][$i]['created_at'])?></span><span class="retweet"><img src="img/icon_rt.gif" valign="middle"> <?=$data2['statuses'][$i]['retweet_count']?></span></div>
</div>
</div>
</div>
<div class="line"></div>
<? endfor; ?>
</div>
</body>
</html> index.php 파일
소스는 대략 이렇습니다. index.php 부분이 실제로 검색한 트윗이 보여지는 부분인데 필요에 맞게 수정해서 사용하면 됩니다. 함께 배포되는 TwitterAPIExchange.php 이 소스는 MIT 라이센스기 때문에 가공해서 재배포, 판매 모두 가능합니다. 배포 되는 이 소스는 GIT에 공개 된 소스를 제가 임의로 재가공해서 다루기 쉽게 한 것입니다. 스크롤링도 안 되고 실시간 불러오는 것도 안 됩니다. 하지만 자바스크립트 settimeout()를 이용 이용해서 새로고침 버튼을 일정시간 마다 실행 시키면 간단합니다. 저는 귀찮아서 안 했는데 이 포스팅 끝나면 추가 해 넣으려고 합니다. 스크롤링 기능은 jquery를 이용하면 간단하니 그건 직접...
설치하기
내려받기 한 소스를 압축 풀어서 아무 곳에나 복사해서 서버에 올리시면 됩니다. 그렇다면 일단 설치는 끝! 이 소스를 적용하고 싶은 페이지에는 include보다 iframe을 추천합니다.
<iframe src="twitter/index.php" border=0 width=1000 height=600></iframe>
소스 분석
<?php
ini_set('display_errors', 1);
ini_set('error_reporting', 'E_ALL^E_NOTICE');
ini_set('date.timezone', 'Asia/Seoul');
자기 서버가 아니면 ini_set()을 이용해서 php.ini 환경 변수 몇 개를 수정 합니다.
require_once('TwitterAPIExchange.php');
if(!$q) $q = urlencode("그누보드");
$q는 검색 키워드입니다. 기본 값이 없으면 임의로 지정합니다.
if($_GET['stx']) $q = urlencode($_GET['stx']);
stx는 그누보드의 검색 키워드 변수입니다. iframe을 통해서 stx 값이 넘어 왔다면 그누보드 검색 키워드로 트윗을 검색 합니다. 현재 작업 중인 wonjustory.com에 적용했습니다. ^^ 사용하지 않을 시 생략 가능합니다.
if($_GET['q']) $q = urlencode($_GET['q']);
$q 값이 GET으로 넘왔다는 건 아래 새로고침 버튼으로 검색 키워드가 넘어 왔다는 것이기 때문에 계속 적용 시킵니다.
//-- https://github.com/J7mbo/twitter-api-php/wiki/Twitter-API-PHP-Wiki 소스 샘플 --//
/** Set access tokens here - see: https://dev.twitter.com/apps/ **/
$settings = array(
'oauth_access_token' => "**************-5MOvYm2JOrQeLZdhVA4tuXD0qAlm5HHrXqRfmNB",
'oauth_access_token_secret' => "Gsty8aG4Iwnh************jOjmQakwPjKZngi6bXT7Jrk",
'consumer_key' => "bJcUKFFltGuW6*******oTsYq",
'consumer_secret' => "37Wxu6mJO4ppEY24************kXZWXrpnMkgrZLszwc9aOyM5"
);
★ 트위터 API 1.1 부터는 API KEY가 필요합니다. 1.0과 많이 달라졌어요. twitterOAuth를 이용해 자동 인증이 되야 API 결과 값을 갖어 올 수 있는데 배포 된 소스에는 이 과정이 자동 처리 되므로 따로 해야 될 건 없습니다. 다만 위에 API KEY를 정확히 입력 해야 합니다. KEY가 여러 종류가 있는데 목적에 맞는 KEY를 모두 생성하고 입력해야 합니다. API KEY는 수시로 변경 가능합니다. http://apps.twitter.com에서 신청 할 수 있습니다.
$url = 'https://api.twitter.com/1.1/search/tweets.json';
트위터는 검색, 타임라인, 링크, 로그인(인증) 등 목적에 따라 API 주소가 모두 다릅니다. 이건 검색 API 주소입니다.
$requestMethod = 'GET';
트위터가 140자로 제한 한 이유가 이것 때문인 듯 합니다. POST 방식도 지원하지만 기본은 GET 방식입니다. URL 뒤에 PARAMETER에 TEXT를 주고 받을 수 있습니다.
$getfield = '?q='.$q.'&count=15";';
이건 URL 뒤에 붙는 매개변수입니다. q는 검색 키워드, count는 불러올 트윗 개수입니다. https://dev.twitter.com/docs/api/1/get/search에 더 많은 변수들을 볼 수 있습니다.
$twitter = new TwitterAPIExchange($settings);
$response = $twitter->setGetfield($getfield)
->buildOauth($url, $requestMethod)
->performRequest();
$data2 = json_decode($response, true);
기본으로 json방식으로 결과를 주는데 xml도 지원 합니다. json_decode에 true 인자를 줘야 배열 형태로 결과를 받을 수 있는데 false로 하거나 값이 없으면 객체형 배열로 받아오는데 다루기가 쉽지 않습니다.
/*
function print_r2($var)
{
ob_start();
print_r($var);
$str = ob_get_contents();
ob_end_clean();
$str = preg_replace("/ /", " ", $str);
echo nl2br("<span style='font-family:Tahoma, 굴림; font-size:9pt;'>$str</span>");
}
그누보드의 함수입니다. 레이아웃 작업 할 때 유용합니다. 배열을 예쁘게 나열 해 주는데 API를 받아서 decode하면 대차원 배열이 되는데 이 함수로 배열 요소들을 한 눈에 볼 수 있습니다.
echo print_r2($data2); 하게 되면 배열 요소가 나열 되고 필요한 정보들만 추출해서 사용 할 수 있습니다. 작업 끝나면 삭제하거나 주석처리 하면 됩니다.
*/
function autolink($text){
return preg_replace('@(https?://([-\w\.]+)+(:\d+)?(/([\w/_\.-]*(\?\S+)?)?)?)@', '<a href="$1" target="_blank">$1</a>', $text);
}
내용 중에 URL이 있으면 자동으로 링크하는 함수
function chgdate($d){
$y = array("01"=>"January", "02"=>"February", "03"=>"March", "04"=>"April", "05"=>"May", "06"=>"June", "07"=>"July", "08"=>"August", "09"=>"September", "10"=>"October", "11"=>"November", "12"=>"December");
$tmp = explode(" ", $d);
foreach($y as $k=>$v) if(strtolower($v) == strtolower($tmp[1])) $tmp[1] = "$k";
$tmp_date = $tmp[5] . "-" .$tmp[1] . "-" . $tmp[2] . " " . $tmp[3];
$d = date("Y.m.d H:i:s", strtotime($tmp_date)+(60*60*9));
return $d;
}
created_at,트위터 작성 날짜가 KST 형식이 아니라서 변형을 시켜줘야 합니다. strtotime을 이용해서 고상하게 해보고 싶었는데 잘 안 되서 원시적인 방법으로 처리 했습니다. 국제 표준시에서 9시간 시차를 적용했습니다. 고상하게 하고 싶었는데...
//-- 목록 시작
?>
<!DOCTYPE html>
<html>
<head>
<meta http-equiv="X-UA-Compatible" content="IE=Edge,chrome=1">
<style>
body { font-size:12px; margin:0; padding:0; font-family:Arial; }
a { text-decoration:none; }
img { border:0; }
</style>
</head>
<body>
<style>
#twitter_box { height:300px; width:100%; overflow-y:scroll; }
#twitter_box .twt_list_box { clear:both; }
#twitter_box .twt_list_box .profile_pic { float:left; width:10%; }
#twitter_box .twt_list_box .profile_pic span { display:inline-block; margin:5px; }
#twitter_box .twt_list_box .text_box { float:left; width:90%; }
#twitter_box .twt_list_box .text_box .user .name { display:inline-block; padding:5px 10px 4px 0; } /* 이름 */
#twitter_box .twt_list_box .text_box .user .name a { color:#3C3C3C; font-weight:bold; font-size:15px; } /* 이름 */
#twitter_box .twt_list_box .text_box .text { margin-bottom:20px; }
#twitter_box .twt_list_box .text_box .text .content { font-size:14px; color:#444444; line-height:130%; }
#twitter_box .twt_list_box .text_box .text .info { display:inline-block; margin: 5px 5px 0 0; }
#twitter_box .twt_list_box .text_box .text .info .src { color:#B3B3B3; font-size:11px; font-family:Arial; } /* 작성 환경 */
#twitter_box .twt_list_box .text_box .text .info .src a { color:#B3B3B3; font-size:11px; font-family:Arial; } /* 작성 환경 */
#twitter_box .twt_list_box .text_box .text .info .date { margin-left:20px; font-family:Arial; color:#868686; }
#twitter_box .twt_list_box .text_box .text .info .retweet { margin-left:20px; font-size:12px; font-family:Dotum; color:#929292; }
#twitter_box .twt_list_box .text_box a { color:#369ED9; font-family:Dotum; }
#twitter_box .twt_list_box .text_box a:hover { text-decoration:underline; }
#twitter_box .redo { text-align:right; }
#twitter_box .redo span { display:inline-block; padding:3px 10px 3px 10px; margin:3px; }
#twitter_box .redo span a { color:#464646; }
#twitter_box .redo span.sword { color:#989898; }
.line { clear:both; border-top:1px solid #EFEFEF; }
</style>
<div id="twitter_box">
<div class="redo"><span class="sword">검색어 : <?=urldecode($q)?></span><span><a href='?q=<?=$q?>'>새로고침 </a><img src="img/icon_redo.gif" valign="middle"></span></div>
<div class="line"></div>
<? for($i = 0; $i < count($data2['statuses']); $i++) :?>
<div class="twt_list_box">
<div class="profile_pic"><span><img src="<?=$data2['statuses'][$i]['user']['profile_image_url']?>"></span></div>
<div class="text_box">
<div class="user"><span class="name"><a href="https://twitter.com/]?>" target="_blank"><?=$data2['statuses'][$i]['user']['name']?></a></span></div>
<div class="text">
<div class="content"><?=autolink($data2['statuses'][$i]['text'])?></div>
<div class="info"><span class="src"><?=$data2['statuses'][$i]['source']?></span><span class="date"><?=chgdate($data2['statuses'][$i]['created_at'])?></span><span class="retweet"><img src="img/icon_rt.gif" valign="middle"> <?=$data2['statuses'][$i]['retweet_count']?></span></div>
</div>
</div>
</div>
<div class="line"></div>
<? endfor; ?>
</div>
</body>
</html>
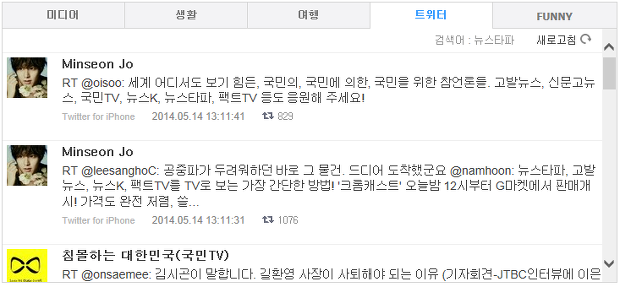
적용한 화면은 대략 이렇습니다. 검색 결과를 일단 배열로 넣는 것까지 성공 했다면 아래 부분은 자기 취향에 맞게 마음 것 수정해서 사용하시면 됩니다.
여러 API 공개 라이브러리를 사용해 봤는데 잘 안되서 애먹었는데 이 소스를 번역기 돌려가면서 사용법을 익혔는데 알고나니 초간단합니다. 저 같은 사이비 개발자가 할 수 있는 정도면 아무나 다룰 수 있는 소스입니다.
내 타임라인 불러오는 것도 있는데 매우 간단합니다.
트위터에서 API Key 받아오기
API 1.1부터 API Key가 있어야 합니다. 인터넷 검색에서 나오는 대부분 예제가 1.0이라 저도 많이 애먹었습니다.
{
code = 215;
message = "Bad Authentication data";
}
이런 결과를 받아 왔다면 API Key가 없거나 사용자가 인증 되지 않았기 때문입니다.
https://apps.twitter.com/ 이 페이지에 접속하면 Create New App 버튼을 만날 수 있습니다. 우측 상단에 있습니다.

들어가보면 이런 페이지를 만나게 됩니다. 내가 만들 프로그램 이름을 입력 합니다. Name. 사용자 이름이 아니라 자기가 만들고자 하는 프로그램의 이름입니다. 그 밑에 프로그램에 대한 간단한 설명과 적용한 웹사이트 주소입니다. callback url은 생략 가능합니다. 인증이 성공 한 경우 이동할 페이지 주소입니다.
Yes, I agree 동의 하신 후에 Create your Twitter application 버튼을 클릭합니다.
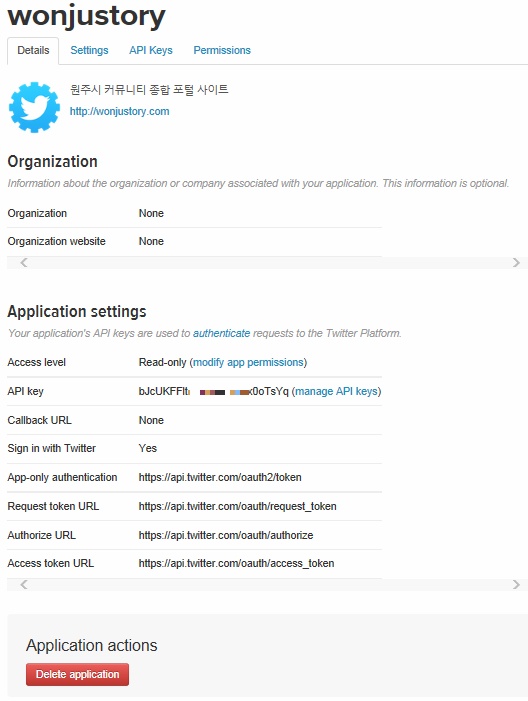
App 등록이 됐다면 API KEY가 생성 됐습니다. 이 페이지는 제가 이미 API Key를 생성하고 관리 할 수 있는 페이지로 이동한 모습입니다. App을 등록하고 API 키를 생성 했는데 어디에 뭐가 있는지 잘 모르겠다 싶으면 일단 http://apps.twitter.com으로 다시 들어갑니다. 아니면 페이지 오른쪽 최상단에 내 프로필 사진이 있는데 클릭하면 메뉴 3개가 열립니다. 맨 위에 back to dev.twitter.com를 선택하면 됩니다. 그렇다면 화면 왼쪽 상단에 방금 내가 등록한 APP 이름이 뜹니다. 저는 wonjustory라는 이름으로 등록했네요. 클릭하시면 이 페이지가 다시 열립니다.
첫 단계에서 APP을 등록하면 일단 API키는 자동 생성 됩니다. 찾아서 쓰기만 하면 됩니다.
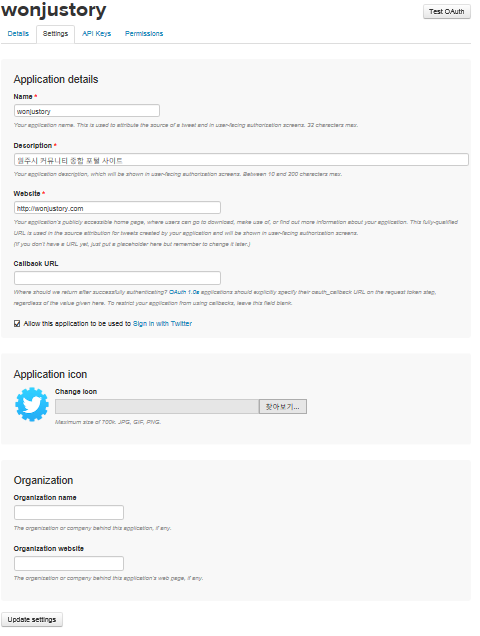
탭 메뉴에서 Settings를 선택하니 APP 등록 할 때 화면이 다시 나왔습니다. APP 정보를 변경 할 수 있습니다. 위에 Test OAuth를 클릭하면 제대로 API Key가 작동하는지 테스트 할 수 있습니다.
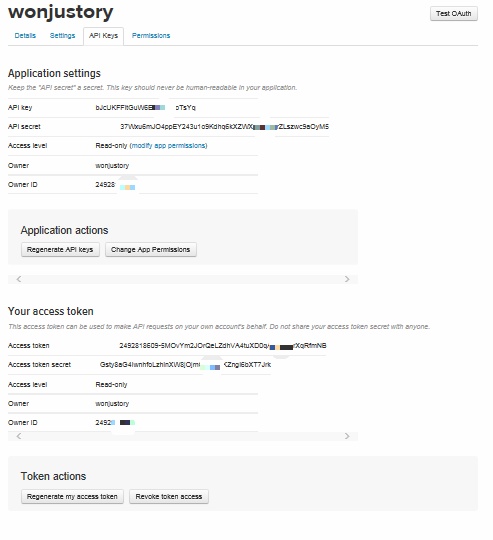
옆에 API Keys를 선택하면 우리가 필요한 API Key들이 있습니다. 여러 개가 있습니다. Regenerate API Keys 버튼은 API Key를 다시 생성하는 것이니 유의 하시기 바랍니다.
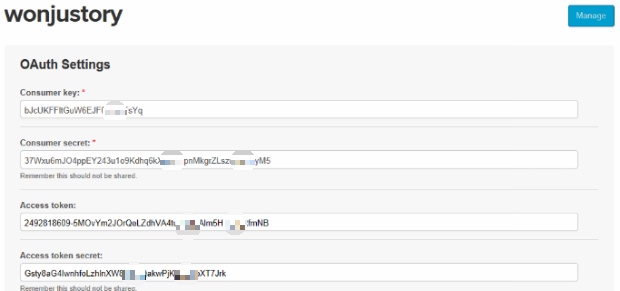
API Key는 위의 탭에서 얻을 수 있는데 공개 되는 소스에서 필요한 consummer key는 찾기가 어려울 수 있습니다. 그럴 때는 Test OAuth 버튼을 클릭하면 이런 화면이 보이는데 여기에 있습니다.
전~부~ 영어로 되어 있어서 어려운 거 같~~지~만~~ 당황하지 않고~~~ 찬찬히 따라하~~~다~~~~ 보~면~ 꽤나 만만하다고 생각이 들면서~~~~ 끗!!!
'프로그래밍 > PHP & HTML' 카테고리의 다른 글
| API로 SNS 페이스북, 트위터, 카카오스토리에 공유하기 소스 (0) | 2019.09.18 |
|---|---|
| 테이블 목록을 불러오는 mysql_list_tables를 사용하는 쿼리 (0) | 2019.09.18 |
| xml 파싱 때 오류 메시지가 나온다면? (Mismatched tag) (0) | 2019.09.18 |